Sometimes, we need to highlight important information, provide special instructions, or separate content by using colored boxes or frames.
In LaTeX, we can create colored boxes using the xcolor, tcolorbox, fancybox, and mdframed packages.
In this guide, we will learn step by step how to create and customize color boxes and frames in LaTeX. Let’s get started!
Basic \fbox{} command
The simplest way to create a framed box in LaTeX is by using the \fbox{} command. This command places a black border around the content.
\documentclass{article}
\begin{document}

This is normal text. \fbox{This text is inside a frame.} And this is outside.

\end{document}
When compiled, the phrase “This text is inside a frame.” will appear inside a black-bordered box.
Customizing frame thickness and padding
The \fbox{} command has default margins and border thickness, but we can customize them using \fboxsep (internal padding) and \fboxrule (border thickness).
\documentclass{article}
\begin{document}

\setlength{\fboxsep}{10pt}  % Internal padding
\setlength{\fboxrule}{2pt}  % Border thickness

\fbox{This is a box with custom padding and border thickness.}

\end{document}
Adding background color with \colorbox{}
The \fbox{} command only adds a border, but if we want to change the background color, we need to use the \colorbox{} command. This requires the xcolor package.
\documentclass{article}
\usepackage{xcolor}

\begin{document}

\colorbox{yellow}{This is text inside a yellow background.}

\end{document}
Here, the background of the text is fully colored in yellow.
Using fcolorbox for border and background
Individually, \fbox{} provides only a border, while \colorbox{} only adds a background color.
But when you combine both using \fcolorbox{}, you get a framed box with a background color, making it more visually appealing.
\fcolorbox{border color} {background color}{content}
\documentclass{article}
\usepackage{xcolor}

\begin{document}

\fcolorbox{red}{yellow}{This text has a red frame and yellow background.}

\end{document}

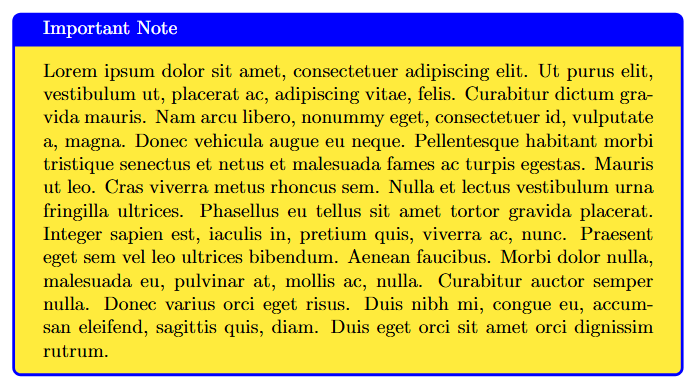
Using tcolorbox for stylish colored boxes
For more advanced and stylish colored boxes, we can use the tcolorbox package. It provides many customization options.
\documentclass{article}
\usepackage{xcolor,lipsum}
\usepackage{tcolorbox}

\begin{document}

\begin{tcolorbox}[colframe=blue, colback=yellow, title=Important Note]

\lipsum[1]}

\end{tcolorbox}

\end{document}
Some boxes in LaTeX have rounded edges, which give a smooth and stylish look.
But if you want a perfect rectangle with sharp edges, you can use sharp corners. This makes sure that all four corners are straight and meet at 90-degree angles.
\begin{tcolorbox}[colframe=blue, colback=yellow, coltitle=yellow, sharp corners, title=Important Note]

\lipsum[1]

\end{tcolorbox}
Framed boxes using mdframed
Another great package for creating framed and colored boxes is mdframed. This package allows more flexibility.
\documentclass{article}
\usepackage{xcolor,lipsum}
\usepackage{mdframed}

\begin{document}

\begin{mdframed}[backgroundcolor=cyan, linewidth=2pt, roundcorner=10pt]
\lipsum[2][1-6]
\end{mdframed}

\end{document}
Creating a shadowed box using fancybox package
The fancybox package in LaTeX provides an easy way to create decorative and stylish. Unlike the simple \fbox{} command, which only adds a basic black border.
\documentclass{article}
\usepackage{xcolor}
\usepackage{fancybox,lipsum}

\begin{document}

\shadowbox{\color{blue} \lipsum[1][1]}

\end{document}
Multi-Column color layout
We can create a multi-column colored box using the tcolorbox and multicol packages, which help in organizing content in multiple columns within a single frame.
\documentclass{article}
\usepackage{tcolorbox}
\usepackage{multicol,lipsum}

\begin{document}

\begin{tcolorbox}[colframe=black, colback=yellow, width=\textwidth]
\begin{multicols}{2}
\lipsum[1][1-2] \\
\lipsum[2][1-2]
\end{multicols}
\end{tcolorbox}

\end{document}