The hspace{len} and hspace*{len} commands are very useful in LaTeX when it comes to text formatting, especially controlling horizontal space.
Table of Contents
However, there are subtle differences between these two commands that make their use different in different situations.
Syntax of hspace
This command is used to add a certain amount of horizontal space between two objects or text in LaTeX. Let’s look at the syntax given below.
\hspace{length}
The value of length specifies how much distance will be added. This length can be in several units, such as centimetre (cm), millimetre (mm), inch (in), point (pt), or depending on the size of letter.
We see through an example how to add horizontal spaces to a text document using hspace.
\documentclass[12pt]{article}
\usepackage{graphicx,lipsum} % Required for inserting images
\begin{document}
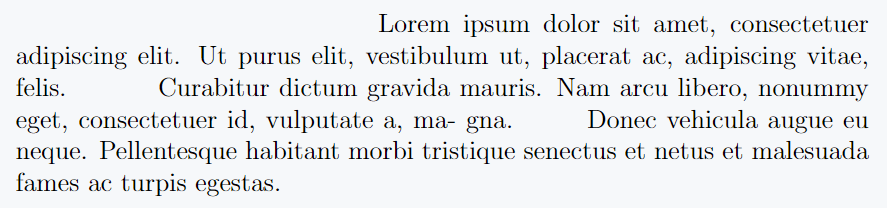
\hspace{5cm} Lorem ipsum dolor sit amet, consectetuer adipiscing elit. Ut purus elit,
vestibulum ut, placerat ac, adipiscing vitae, felis. \hspace{.4in} Curabitur dictum gravida
mauris. Nam arcu libero, nonummy eget, consectetuer id, vulputate a, ma-
gna. \hspace{20pt} Donec vehicula augue eu neque. Pellentesque habitant morbi tristique
senectus et netus et malesuada fames ac turpis egestas.
\end{document}
Output :
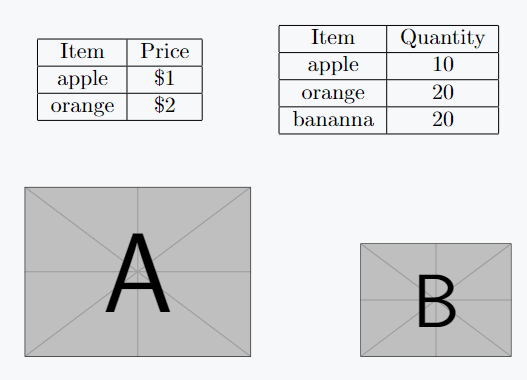
Use of this command is not limited to text, you can use it in different objects such as two or more horizontal figures or tables, multi-column pages, etc.
\documentclass{article}
\usepackage{graphicx}
\begin{document}

\begin{table}[h]
\centering
\begin{tabular}{|c|c|}
\hline
Item & Price \\ \hline
apple& \$1 \\ \hline
orange & \$2 \\ \hline
\end{tabular}
\hspace{1cm}
\begin{tabular}{|c|c|}
\hline
Item & Quantity \\ \hline
apple & 10 \\ \hline
orange & 20 \\ \hline
banana & 20 \\ \hline
\end{tabular}

\end{table}

\begin{figure}[h]
\centering
\includegraphics[width=0.3\linewidth]{example-image-a}
\hspace{.6in}
\includegraphics[width=0.2\linewidth]{example-image-b}
\end{figure}

\end{document}
Output :
Uses of hspace*
The main difference between \hspace and \hspace* is their behavior with line breaks. While the standard command does not add space after a break, the starred version ensures the space remains even at the beginning of a new line.
Let’s look at the example so that it will be easier to understand more.
\documentclass[12pt]{article}
\usepackage{graphicx,lipsum} % Required for inserting images
\begin{document}

Sed commodo posuere pede. Mauris ut est. Ut quis purus. Sed ac odio.
Sed vehicula hendrerit sem. Duis non odio. Morbi ut dui. Sed accumsan
risus eget odio.\\[5pt] \hspace{3cm}In hac habitasse platea dictumst. Pellentesque non elit.
Fusce sed justo eu urna porta tincidunt. Mauris felis odio, sollicitudin sed,
volutpat a, ornare ac, erat. \\[5pt] \hspace*{3cm}Morbi quis dolor. Donec pellentesque, erat ac
sagittis semper, nunc dui lobortis purus, quis congue purus metus ultricies
tellus. Proin et quam.\\[5pt] \hspace*{5cm}
Class aptent taciti sociosqu ad litora torquent per
conubia nostra, per inceptos hymenaeos. Praesent sapien turpis, fermentum
vel, eleifend faucibus, vehicula eu, lacus.

\end{document}
Output :
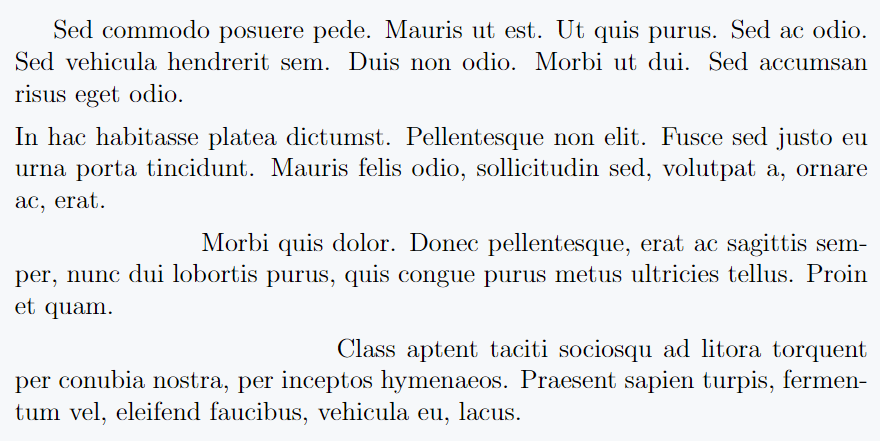
In the first case, even after adding \\[5pt] \hspace{3cm} to beginning of second line, spaces will not appear. However, in the second and third situations, it is possible.
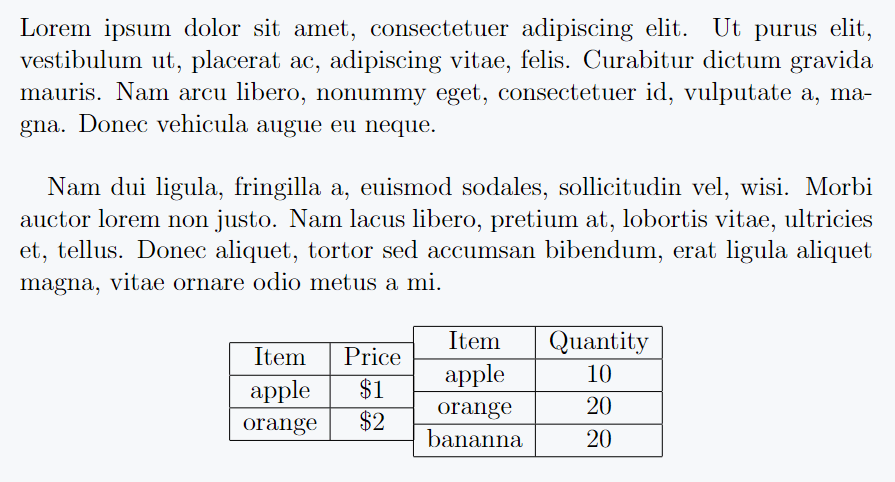
Pass negative value
It is possible to pass negative values between both commands, and this can be very useful when you want to reduce the distance between two objects or overlap objects. Negative horizontal space pulls text or objects closer together, which is sometimes necessary for design.
\documentclass[12pt]{article}
\usepackage{graphicx,lipsum}
\begin{document}

\hspace{-\parindent}Lorem ipsum dolor sit amet, consectetuer adipiscing elit. Ut purus elit,
vestibulum ut, placerat ac, adipiscing vitae, felis. Curabitur dictum  gravida
mauris. Nam arcu libero,  nonummy eget, consectetuer id, vulputate a, ma-
gna. Donec vehicula augue eu neque. \\

\hspace*{-5pt}Nam dui ligula, fringilla a, euismod sodales, sollicitudin vel, wisi. Morbi
auctor lorem non justo. Nam lacus libero, pretium at, lobortis vitae, ultricies
et, tellus. Donec aliquet, tortor sed accumsan bibendum, erat ligula aliquet
magna, vitae ornare odio metus a mi.

\begin{table}[h]
\centering
\begin{tabular}{|c|c|}
\hline
Item & Price \\ \hline
apple& \$1 \\ \hline
orange & \$2 \\ \hline
\end{tabular}
\hspace{-8pt}
\begin{tabular}{|c|c|}
\hline
Item & Quantity \\ \hline
apple & 10 \\ \hline
orange & 20 \\ \hline
banana & 20 \\ \hline
\end{tabular}
\end{table}

\end{document}
Output :
Many of us don’t like indents on the first line of a paragraph, so we use noindent command to remove indentations. The same can be done by passing -perindnet command inside hspace{-perindent} command.
Float elements are positioned leaving some fixed space around. You can decrease the space distance between two or more objects by passing negative values.
Frequently Asked Questions(FAQ’s)
What is the difference between hspace and hspace*?
The hspace command doesn’t work after line break, when you add a star to this command, this command works beautifully even after line break.
Can I use negative values to bring the text closer together?
Yes, it is possible to bring text closer using negative values, which is very nicely discussed in the above point.
Is the hspace command only for horizontal space?
Yes, both commands are used to add horizontal (sideways) spaces only. Use the vspace command for vertical space.
Conclusion
To add horizontal space in a LaTeX document, use the \hspace{len} command. It helps create space between words, images, or tables, making the layout look balanced and neat.
You can also use negative values to reduce space, bringing text or objects closer together or even overlapping them for precise adjustments.
Jidan
LaTeX enthusiast and physics educator who enjoys explaining mathematical typesetting and scientific writing in a simple way. Writes tutorials to help students and beginners understand LaTeX more easily.